Introduction
I’m going to tell you a story, its about love, death and re-birth… Or something

In the beginning there was a young html element called <table>. He had one purpose in life, to display data and life was good. But before long though he had been corrupted, his masters used him to define layout and structure. Things he was not originally designed to do, and so began the dark ages of web design. Then one day, there came a young knight called CSS, and with him he brought light to designers everywhere. He was so beloved, the designers made him their King. Under his rule (selectors… sorry bad joke) the web flourished, sites became less structured, better looking and more responsive.
He was so well loved, people tried to make everything in his image. They found that they could display data in grid shaped patterns using lists and the all-powerful code that CSS had bestowed up on them.
But all was not well in the Kingdom of Web, the poor forgotten element table looked on. Increasingly spurned, he grew jealous. He knew that with his one purpose in life, he could display data better than any other magical element. But how could he regain his once strong foothold in the land of websites?
He, being a simple yet good element, prayed to the Gods of Standards and they heard him. They rebuilt and tweaked him, they made him streamlined and functional. Once they were done, they set him out into the world with a renewed purpose. Capable of showing data better than ever before, he approached the King, who now having moved on in years and being more mature recognized the tables usefulness and decided to re-instate the lowly table back in to his rightful place.
And the moral of the story is… use tables to show tabular data… don’t try and invent the wheel!
I also apologize for desecrating the HTML logo with my terrible drawing skills 🙂
On with the tutorial!
HTML5 has brought in several changes to the table element. Gone are the majority of table attributes, width/height, cellspacing/cellpadding and border are all gone. The look and feel should now be controlled by CSS (as it should be). In the above story, I said not to use tables for layout… people are still going to do this, they do provide structure and layout quiet easily. To help with this, it is now recommended that the attribute role should be specified with a value of “presentation”. This is to help site scrapers/aggregators know what content to ignore.
<table role="presentation"></table>
The following elements are for use within the table element:
- caption
- colgroup
- col
- tbody
- thead
- tfoot
- tr
- td
- th
Each has a specific and well defined function. They also have to be used in specific ways and orders.
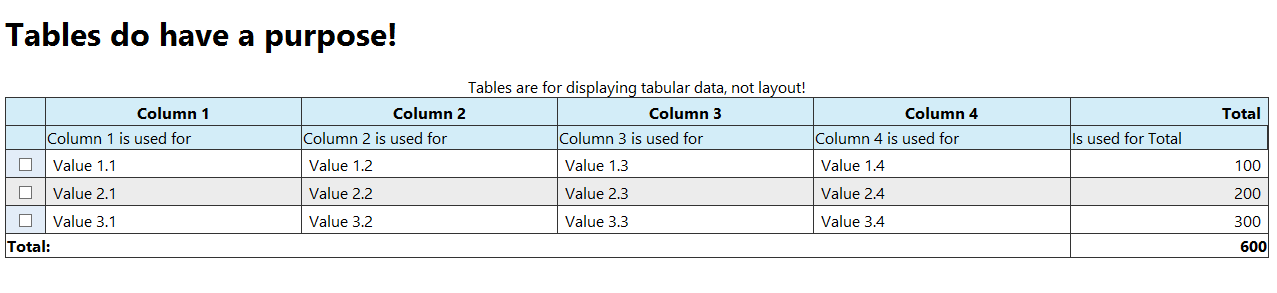
The <caption> element must be the 1st child element of a table, its purpose is to describe what the table is being used for. It appears on top of the table data.
<table id="table-1">
    <caption>Tables are for displaying tabular data, not layout!</caption>
</table>
Next up is the <colgroup> element, it’s used for grouping columns together. By specifying the span attribute you can tell the browser to apply a style to the columns (represented by the <col> element) in that group. Both the <colgroup> and <col> elements can use the span attribute, but they cannot be used at the same. It’s on one or the other but not both.
<table id="table-1">
    <caption>Tables are for displaying tabular data, not layout!</caption>
    <colgroup>
        <col />
        <col />
        <col />
        <col />
        <col />
        <col />
    </colgroup>
</table>
The <colgroup> and <col> elements are used for presentation, to actually define a tables columns you use the <thead> element. To define the columns you specify a single <tr> element and then use the <th> element.
<table id="table-1">
    <caption>Tables are for displaying tabular data, not layout!</caption>
    <colgroup>
        <col />
        <col />
        <col />
        <col />
        <col />
        <col />
    </colgroup>
    <thead>
        <tr>
            <th scope="col"></th>
            <th scope="col">Column 1</th>
            <th scope="col">Column 2</th>
            <th scope="col">Column 3</th>
            <th scope="col">Column 4</th>
            <th scope="col">Total</th>
        </tr>
    </thead>
</table>
You can actually (optionally) specify a 2nd <tr> at this point, you can use this to define the usage of a column.
<table id="table-1">
    <caption>Tables are for displaying tabular data, not layout!</caption>
    <colgroup>
        <col />
        <col />
        <col />
        <col />
        <col />
        <col />
    </colgroup>
    <thead>
        <tr>
            <th scope="col"></th>
            <th scope="col">Column 1</th>
            <th scope="col">Column 2</th>
            <th scope="col">Column 3</th>
            <th scope="col">Column 4</th>
            <th scope="col">Total</th>
        </tr>
        <tr>
            <td></td>
            <td>Column 1 is used for</td>
            <td>Column 2 is used for</td>
            <td>Column 3 is used for</td>
            <td>Column 4 is used for</td>
            <td>Is used for Total</td>
        </tr>
    </thead>
</table>
Now that we have the table structure defined, we can start defining the data. To do this, we use the <tbody> element.
<table id="table-1">
    <caption>Tables are for displaying tabular data, not layout!</caption>
    <colgroup>
        <col />
        <col />
        <col />
        <col />
        <col />
        <col />
    </colgroup>
    <thead>
        <tr>
            <th scope="col"></th>
            <th scope="col">Column 1</th>
            <th scope="col">Column 2</th>
            <th scope="col">Column 3</th>
            <th scope="col">Column 4</th>
            <th scope="col">Total</th>
        </tr>
        <tr>
            <td></td>
            <td>Column 1 is used for</td>
            <td>Column 2 is used for</td>
            <td>Column 3 is used for</td>
            <td>Column 4 is used for</td>
            <td>Is used for Total</td>
        </tr>
    </thead>
    <tbody>
        <tr>
            <th scope="row"><input type="checkbox" /></th>
            <td>Value 1.1</td>
            <td>Value 1.2</td>
            <td>Value 1.3</td>
            <td>Value 1.4</td>
            <td>100</td>
        </tr>
        <tr>
            <th scope="row"><input type="checkbox" /></th>
            <td>Value 2.1</td>
            <td>Value 2.2</td>
            <td>Value 2.3</td>
            <td>Value 2.4</td>
            <td>200</td>
        </tr>
        <tr>
            <th scope="row"><input type="checkbox" /></th>
            <td>Value 3.1</td>
            <td>Value 3.2</td>
            <td>Value 3.3</td>
            <td>Value 3.4</td>
            <td>300</td>
        </tr>
    </tbody>
</table>
As you can see I’ve added a check box to the 1st column, for each row I’ve the scope of the column to the row. This is to indicate that its value represents the row.
Finally we can specify out footer details, this can actually be defined above the
but for ease of reading and flow I’ve left it until last.
<table id="table-1">
    <caption>Tables are for displaying tabular data, not layout!</caption>
    <colgroup>
        <col />
        <col />
        <col />
        <col />
        <col />
        <col />
    </colgroup>
    <thead>
        <tr>
            <th scope="col"></th>
            <th scope="col">Column 1</th>
            <th scope="col">Column 2</th>
            <th scope="col">Column 3</th>
            <th scope="col">Column 4</th>
            <th scope="col">Total</th>
        </tr>
        <tr>
            <td></td>
            <td>Column 1 is used for</td>
            <td>Column 2 is used for</td>
            <td>Column 3 is used for</td>
            <td>Column 4 is used for</td>
            <td>Is used for Total</td>
        </tr>
    </thead>
    <tbody>
        <tr>
            <th scope="row"><input type="checkbox" /></th>
            <td>Value 1.1</td>
            <td>Value 1.2</td>
            <td>Value 1.3</td>
            <td>Value 1.4</td>
            <td>100</td>
        </tr>
        <tr>
            <th scope="row"><input type="checkbox" /></th>
            <td>Value 2.1</td>
            <td>Value 2.2</td>
            <td>Value 2.3</td>
            <td>Value 2.4</td>
            <td>200</td>
        </tr>
        <tr>
            <th scope="row"><input type="checkbox" /></th>
            <td>Value 3.1</td>
            <td>Value 3.2</td>
            <td>Value 3.3</td>
            <td>Value 3.4</td>
            <td>300</td>
        </tr>
    </tbody>
    <tfoot>
        <tr>
            <th colspan="5" scope="row">Total:</th>
            <th scope="col">600</th>
        </tr>
    </tfoot>
</table>
As you can see it mimics the <thead> structure, with a <tr> element and child <th> columns.
I’ve also created some simple CSS to style the various elements in this tutorial. It’s pretty basic, but I am using the first/last/nth-child selectors to highlight specific columns or rows.
If I wanted to make the text alignment of the last column for each element align right, I could use the following CSS.
table tbody tr td:last-child, table thead tr th:last-child, table tfoot tr th:last-child {
    text-align: right;
}
Here I’m using them to give alternating rows different colours.
table tbody tr:nth-child(even){
    background-color: #ececec;
}

table tbody tr:nth-child(odd){
    background-color: #ffffff;
}
And there you have it, the simple table has been redeeemd. No complex floating of elements, no excessive CSS tricks or maniplulations. Just plain, simple HTML as it should be.
The full CSS I’ve used in this tutorial is available in the download below.