Introduction
Building on my previous tutorial, I thought it would an idea to show how to apply what we learned to the most basic of website features, the menu! I would strongly suggest reading my previous tutorial as we’ll be jumping in at the deep end here. Once again, no JavaScript was used in the making of this tutorial!
Every website has a menu, and there are lots of different styles that you can use. One style that is quiet popular in web applications and mini-sites is the accordion menu. The accordion is a simple multi-level (generally 2) menu that is of fixed height and width that has room for submenu items to expand into a space underneath the main menu item. Clicking on a top level item expands its children, while collapsing everything else.
There are a few things that you need to keep an eye on when creating an accordion menu. Its size and how you handle top level items with lots of children are probably the most important.
The HTML
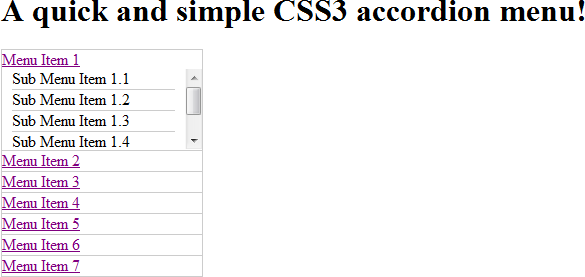
The following example HTML has 7 top level menu items, each with various numbers of submenu items. This can be wrapped in either a <nav> or <menu> element, if you’re not sure have a look at my tutorial on what each one is used for.
<ol>
	<li id="item-1"><a href="#item-1"><span>Menu Item 1<span></a>
		<ol>
			<li>Sub Menu Item 1.1</li>
			<li>Sub Menu Item 1.2</li>
			<li>Sub Menu Item 1.3</li>
			<li>Sub Menu Item 1.4</li>
			<li>Sub Menu Item 1.5</li>
			<li>Sub Menu Item 1.6</li>
		</ol>
	</li>
	<li id="item-2"><a href="#item-2"><span>Menu Item 2<span></a>
		<ol>
			<li>Sub Menu Item 2.1</li>
			<li>Sub Menu Item 2.2</li>
			<li>Sub Menu Item 2.3</li>
		</ol>
	</li>
	<li id="item-3"><a href="#item-3"><span>Menu Item 3<span></a>
		<ol>
			<li>Sub Menu Item 3.1</li>
			<li>Sub Menu Item 3.2</li>
			<li>Sub Menu Item 3.3</li>
		</ol>
	</li>
	<li id="item-4"><a href="#item-4"><span>Menu Item 4<span></a>
		<ol>
			<li>Sub Menu Item 4.1</li>
			<li>Sub Menu Item 4.2</li>
			<li>Sub Menu Item 4.3</li>
		</ol>
	</li>
	<li id="item-5"><a href="#item-5"><span>Menu Item 5<span></a>
		<ol>
			<li>Sub Menu Item 5.1</li>
			<li>Sub Menu Item 5.2</li>
			<li>Sub Menu Item 5.3</li>
		</ol>
	</li>
	<li id="item-6"><a href="#item-6"><span>Menu Item 6<span></a>
		<ol>
			<li>Sub Menu Item 6.1</li>
			<li>Sub Menu Item 6.2</li>
			<li>Sub Menu Item 6.3</li>
		</ol>
	</li>
	<li id="item-7"><a href="#item-7"><span>Menu Item 7<span></a>
		<ol>
			<li>Sub Menu Item 7.1</li>
			<li>Sub Menu Item 7.2</li>
			<li>Sub Menu Item 7.3</li>
		</ol>
	</li>
</ol>
The Top Level Menu CSS
We want the accordion to move up and down smoothly, so we’re going to use a height based transition; we’ll link it to the anchors of the menu items in the HTML above. First, we’ll set a height on the top level <li> and add our transition. We’re also going to hide its overflow. We do this so we don’t get any unnecessary scrollbars. Once that’s done, we can now add our ‘trigger’ CSS selector ‘ol li:target’, here we will set the height of the <li> and the transition should start whenever the anchor is selected.
ol {
	list-style: none;
	border: 1px solid #cccccc;
	margin: 0px;
	padding: 0px;
	min-width: 150px;
	max-width: 200px;
}

ol li {
	height: 20px;
	border-bottom: 1px solid #cccccc;
	transition: height 1s ease-in-out;
	-webkit-transition: height 1s ease-in-out;
	-moz-transition: height 1s ease-in-out;
	-ms-transition: height 1s ease-in-out;
	-o-transition: height 1s ease-in-out;
	overflow: hidden;
}

ol li:last-child {
	border-bottom: 0px;
}

ol li:target {
	height: 100px;
}
The Submenu CSS
Now that we have the top level menu items styled and transitioning, let’s add the submenu CSS.
ol li ol{
	opacity: 0;
	padding-left: 10px;
	padding-right: 10px;
	border: 0px;
	max-width: 100%;
	max-height: 80px;
	overflow-y: auto;
	transition: all 1s ease-in-out;
	-webkit-transition: all 1s ease-in-out;
	-moz-transition: all 1s ease-in-out;
	-ms-transition: all 1s ease-in-out;
	-o-transition: all 1s ease-in-out;
}

ol li:target ol{
	opacity: 1;
}
For this transition, I’m changing the opacity so that the menu items gradually appear under their parent. I’m also setting the overflow-y and max-height values. In the parent CSS I set a height for the <li> of 100px, that gives us about 80px of space for the submenu. The first menu item has 6 submenus, so adding the “overflow-y: auto” means we won’t have any rendering problems and the menu size stays consistent.
Conclusion
There you have it, a simple JavaScript free accordion menu. Because we’re using anchors/targets as our method of triggering the transition, bookmarking the url will ensure that the right menu item is expanded when the user visits the bookmark at a later date.
Feel free to have a play around with the various transitions and changing the heights to see what you can come up with.

