WordPress 3.0 introduced users to a powerful feature: custom menus.
Now, without the need for plugins, we can exclude, include, and rearrange our page links at will, displaying a different menu for different pages, and with some code, even different users entirely.
How to Create a Custom WordPress Menu
Creating a custom menu is simple. Log into your WordPress Administrative Dashboard and select “Menus” under the appearance tab. From here, select the “Menu Name” input and give your new custom menu a title. Anything works, but let’s use “Main Menu” for the purposes of this tutorial. Once you’ve typed that in, hit the blue “Create Menu” button.
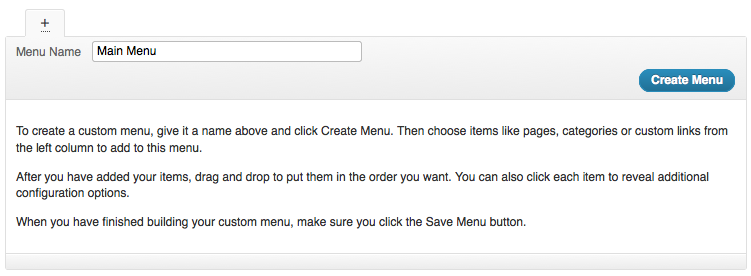 Alright, now we’ve got a new custom menu setup, but we need to add some links. There are three types of things we can add to our menu: Custom Links, Pages, and Categories. Custom Links let you link to external pages (great for incorporating network websites, related projects, and affiliate links). Pages lets you add WordPress pages to the menu. Categories lets you add links to a specific category archive.
To add a custom link, type in the destination URL then assign the menu item a label (the text that will appear in your navigation menu for that URL). Finally, click “Add to menu.”
To add a page or category, toggle the checkbox next to the item you want to add, then hit the “add to menu” button.
To modify a navigation item’s label, simply click on the item to expand its options, then change the “navigation label” input to whatever text you want to appear on your website. You can also assign each menu link a title attribute (text that appears when you hover over a link) for added SEO and usability benefit.
Tip: automatically include any new parent pages you make by checking the “automatically add top level pages” box next to the menu title.
How to Create Drop-Down Menus with WordPress
If your theme supports drop-down menus, you can easily arrange parents and children by simply clicking and dragging menu items into an indented position. Similar to moving widgets into a widget area or moving around boxes in the admin dashboard, gray rectangles will appear beneath each menu item, creating a position for you to drop the menu item into. From there, your theme will generate the necessary code for drop-down positioning between parent and child.
How to Use Custom WordPress Menus
Now that you’ve created your menu, you have to assign it to a location on your website. This is where the “theme locations” tab comes into play. Depending on the theme you’re using, there could be just one (twenty-eleven has just a main menu area) or multiple (headway themes gives you the ability to add as many navigation menus as you want on your website).
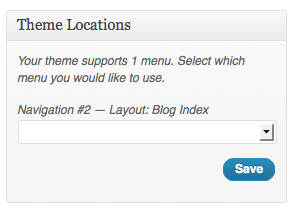 Choose the area you want to assign your menu to, and click the dropdown field. It will display all of the custom menus you’ve created. Select the menu you wish to assign (in our case, we only have Main Menu created, so we’ll use this one) and then hit the “save” button.
Theme locations that have no menu assigned will, by default, show all public pages that have been published.
How to Make Your Theme Custom Menu Compatible
When developing your own themes, developing your own theme locations could be important to the creation of your theme. The basics of integrating menu support involve defining menus (the name of our theme locations) and then calling them in our templates.
First, let’s define some menus. Add the following code to your theme’s functions.php file:
function register_my_menus() {
register_nav_menus(
array(
'top-menu' => __( 'Top Menu' ),
'footer-menu' => __( 'Footer Menu' )
)
);
}
add_action( 'init', 'register_my_menus' );
This function assumes that we’re going to be building two menus, one for the main navigation and one for the footer. Now if we were to call the menu in our header.php or footer.php files, they would look like this:
<?php wp_nav_menu( array( 'theme_location' => 'top-menu' )); ?>or
<?php wp_nav_menu( array( 'theme_location' => 'footer-menu' )); ?>Creating your own menu locations for themes can be used in a variety of ways, especially if WordPress conditional tags are employed. For example, let’s say we wanted a user to see a menu only if they’re logged in. We could place the following code in the header.php file:
<?php
if ( is_user_logged_in() ) {
wp_nav_menu(array('theme_location'=>'user-menu'));
} else {
wp_nav_menu(array('theme_location'=>'main-menu'));
}
?>
Conditional tags offer us the ability to show different menus on all kinds of system pages like archives, categories, specific pages, etc. You can find a list of conditional tags on the WordPress Codex.
How are you using custom menus to enhance your WordPress theme? What questions do you have about developing with custom menus? Share your thoughts and experiences in the comments below.