In part one of our post Up and Running With Custom Post Types, we covered the concept behind WordPress’s Custom Post Type feature, and how to get started by creating your own custom post type. We also covered ways to keep it modular by utilizing a separate PHP file, allowing you to port the post type from theme to theme.
In this post, we’ll cover creating Taxonomies for your custom post types, creating custom fields and meta boxes, saving your data and using it in your WordPress themes.
Let’s get rollin’!
Creating Taxonomies (To Categorize By)
The next step is to set up some taxonomies to categorize your custom post type by. These are effectively the same thing as Categories for posts, except we can make them whatever we want with just a few lines of code.
For this, we are using the WordPress function register_taxonomy();. As you can see below and on the Codex, the arguments it takes is the taxonomy, followed by the object type, and finally the $args. For our example here, we create two taxonomies – Skills and Club Level. We assign the taxonomies to the “athlete” post type, and then give it arguments including labels and rewrite privileges. Let’s take a look at the code.
register_taxonomy("Sport", array("athlete"), array("hierarchical" => true, "label" => "Sport", "singular_label" => "Sport", "rewrite" => true));
register_taxonomy("Club Level", array("athlete"), array("hierarchical" => true, "label" => "Club Level", "singular_label" => "Club Level", "rewrite" => true));
The registered taxonomies come through looking like this.
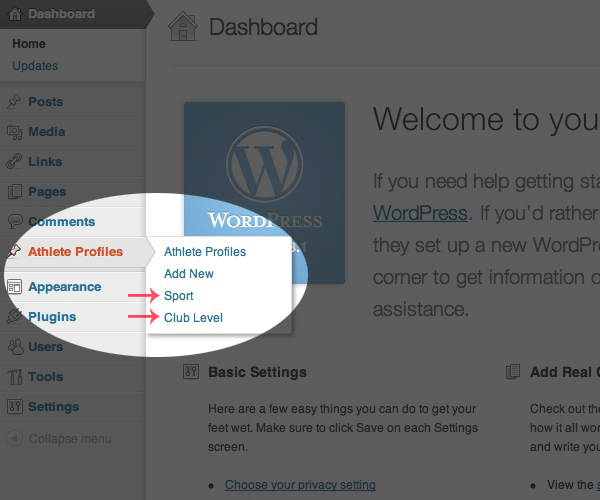 You can click on the post types and you will be presented with a screen that looks just like the Categories page, and the ability to add your custom taxonomies.
So we’re done, right?
Well, effectively, you do have a custom post type that works and functions. Although currently, it’s not any different than a regular post. Let’s dig in to creating custom fields in your posts that will allow you to get unique information and display them back in your theme.
Creating Custom Fields
To start off the true magic of custom post types, you have to first initialize a function to add the meta boxes. We’ll call ours admin_init() and call it like this:
add_action("admin_init", "admin_init");

function admin_init(){
  add_meta_box("personal_info", "Personal Info", "personal_info", "athlete", "normal", "low");
}
The first part of that code initalizes the function admin_init(). Obviously the second part of that code is the actual function. Basically it’s telling your theme to create a new meta box called Personal Info, put it in the post type of “athlete” and give it a low priority (placement in the post type).
Cool! We’re done, right?
Nope. Close though. Let’s add a few custom fields to populate. This will dabble more in HTML than PHP.
Creating Fields In Your Meta Box
Now this is where the fun comes in. We’re going to create a personal info meta box (we’ll, we already created it above – now we’re going to fill it out) that will ask for a persons first name, last name, gender, email, phone number and birthday.
To do this, we create a function called personal_info(). This is the same function we called in our admin_init() function. Light bulbs going on now? The lines are starting to connect.
Within the function, we first set some variables. We declare variables for $custom, and then using that variable, we create variables for all of our fields. After that, we close out the php, and render the fields with some good ol’ HTML. I use tables just for ease of use and the ability to quickly and easily port this to other post types, but feel free to use div’s or whatever your personal preference is.
function personal_info() {
	global $post;
	$custom = get_post_custom($post->ID);
	$first_name = $custom["first_name"][0];
	$last_name = $custom["last_name"][0];
	$gender = $custom["gender"][0];
	$email = $custom["email"][0];
	$phone = $custom["phone"][0];
	$birthday = $custom["birthday"][0];
	?>
	<table cellspacing="2">
		<tr>
			<td>
				<label>Name:</label>
			</td>
			<td>
				<input type="text" name="first_name" placeholder="First Name" value="<?php echo $first_name; ?>">
			</td>
			<td>
				<input type="text" name="last_name" placeholder="Last Name" value="<?php echo $last_name; ?>">
			</td>
		</tr>
		<tr><td><label>Gender:</label></td><td><input type="text" name="gender" placeholder="Male or Female" value="<?php echo $gender; ?>"></td></tr>
		<tr><td><label>Email:</label></td><td><input type="text" name="email" placeholder="you@gmail.com" value="<?php echo $email; ?>"></td></tr>
		<tr><td><label>Phone:</label></td><td><input type="text" name="phone" placeholder="(540) 555-5555" value="<?php echo $phone; ?>"></td></tr>
		<tr><td><label>Birthday:</label></td><td><input type="text" name="birthday" placeholder="12/12/1987" value="<?php echo $birthday; ?>"></td></tr>
	</table>
	<?php
}
Whew, get all that? We’re done now, right?
Close. All that’s left is to save it.
Saving Your Custom Post Type Data
The final piece to the puzzle is to save your custom post type data to the database. To do this, we create a new function called save_details() which tells WordPress to take whatever is in the meta box and store it to the database. It also tells WordPress if it already exists in the database, check and see if it’s changed and if the value has changed, update it to the most recent value.
Let’s dive into the code:
add_action('save_post', 'save_details');

function save_details(){
  global $post;
  $postID = $post->ID;

  // To prevent metadata or custom fields from disappearing...
  if ( defined('DOING_AUTOSAVE') && DOING_AUTOSAVE )
  return $postID;

  update_post_meta($postID, "first_name", $_POST["first_name"]);
  update_post_meta($postID, "last_name", $_POST["last_name"]);
  update_post_meta($postID, "gender", $_POST["gender"]);
  update_post_meta($postID, "email", $_POST["email"]);
  update_post_meta($postID, "phone", $_POST["phone"]);
  update_post_meta($postID, "birthday", $_POST["birthday"]);
}
And there you have it! You very own custom post type.
Using Your Custom Fields In Your Theme
The finishing touches is to actually use the custom post type in your theme! I’ll dive more in depth on the amazing stuff you can do with this, but to get you started, all you need to do is include this little code snippet in your theme templates:
<?php echo get_post_meta($post->ID, 'first_name', true) ?>It’s as simple as that! Obviously, substitute first_name for whatever your field is called, but once you’ve got that included, you’re good to go.
Now, go out and create some seriously cool custom post types!